


© 2010 - 2026 SouthBit Data Recovery, Studio 109, Palmyra Junction, 9 Palmyra Road, Claremont, 7708, 021 205 1119
★ 4.9-star rated · 700+ Google reviews · Free 24-hour quote · No fix, no fee
Have you ever wanted to see what the inside of your hard drive looks like? From the outside it looks like a small, unremarkable metal box — but inside is some of the most precise engineering in any consumer device. The read/write heads fly just nanometres above spinning platters at thousands of revolutions per minute. A human hair is roughly 70,000 nanometres thick. The operating clearance inside a hard drive is closer to 5.
Understanding these components matters when a drive fails — because how and why a drive fails determines exactly how we recover the data from it. This guide uses a Western Digital 3.5″ hard drive as a representative example of modern HDD architecture. The photos below were taken in our Claremont lab and helps to explain the data recovery process.
Contents
- What are the main components of a hard drive?
- The hard disk assembly (HDA) — external overview
- The printed circuit board (PCB)
- SATA connectors
- Opening the drive — why a cleanroom is essential
- Inside the hard drive — main internal components
- The air filter
- Magnets and the voice coil
- The heads connector
- The head stack assembly (HSA) and read/write heads
- Sliders — how heads fly above the platter
- The preamp
- Frequently asked questions
What are the main components of a hard drive?
A hard drive consists of seven main components: the hard disk assembly (HDA) casing, the printed circuit board (PCB), the platters (which store data magnetically), the spindle motor (which spins the platters), the head stack assembly (HSA) with read/write heads, the voice coil and magnets (which move the heads), and the drive firmware stored in the service area of the platters.
💿
Platters
Polished aluminium or glass discs coated with a magnetic material. Your data lives here.
🔩
Spindle Motor
Spins the platters at 5,400–7,200 RPM. A seized motor = a drive that won't spin up at all.
🦾
Head Stack Assembly
The actuator arm that holds the read/write heads. The most commonly failed component we see.
🧲
Voice Coil & Magnets
Neodymium magnets and a coil that position the heads with extreme precision across the platter surface.
🟢
Printed Circuit Board
The drive's electronics: MCU, motor controller, cache, and firmware ROM. Visible on the underside.
⚙️
Firmware
Stored partly on the PCB ROM and partly on the platters themselves. Controls all drive operations.
🔊
Preamp
Amplifies the extremely weak read signals from the heads to a usable level. Located on the HSA itself.
The hard disk assembly (HDA) — external overview
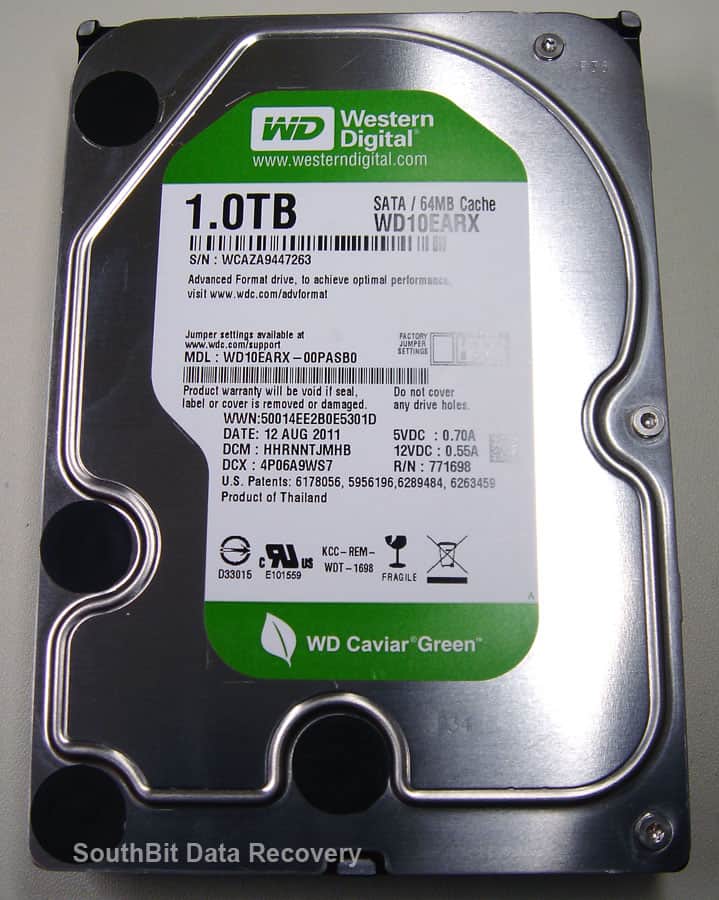
The hard disk assembly, or HDA, is the main sealed metal enclosure — what most people simply call "the hard drive." The top of the HDA is covered by the top cover, typically a silver metal lid, with a label on the outside carrying the drive's model number, serial number, capacity, and firmware version. These details matter in data recovery: certain recovery procedures require a perfectly matched donor drive, and model and firmware revision must align precisely.
The printed circuit board (PCB)
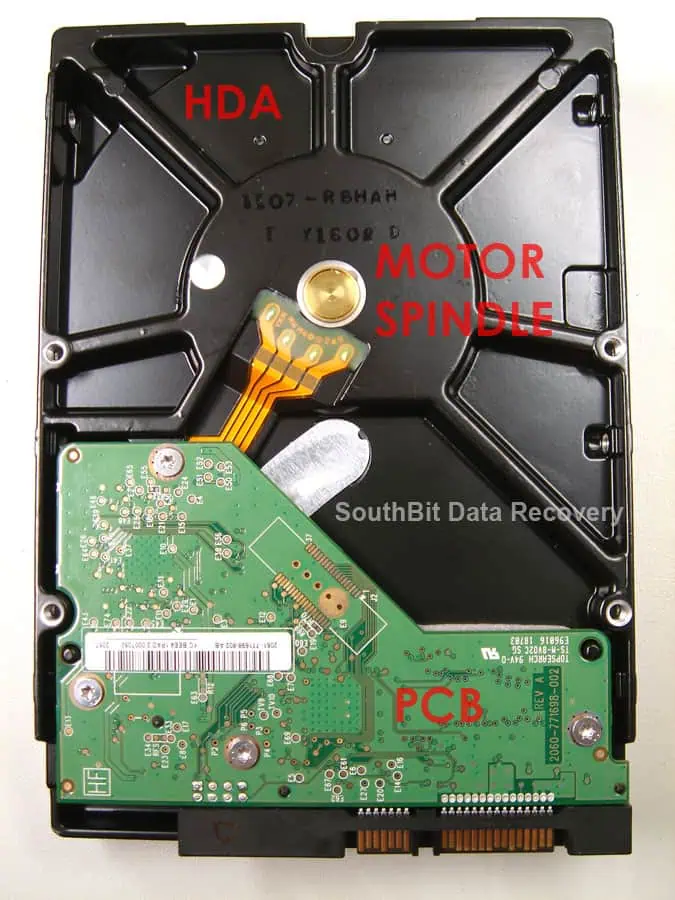
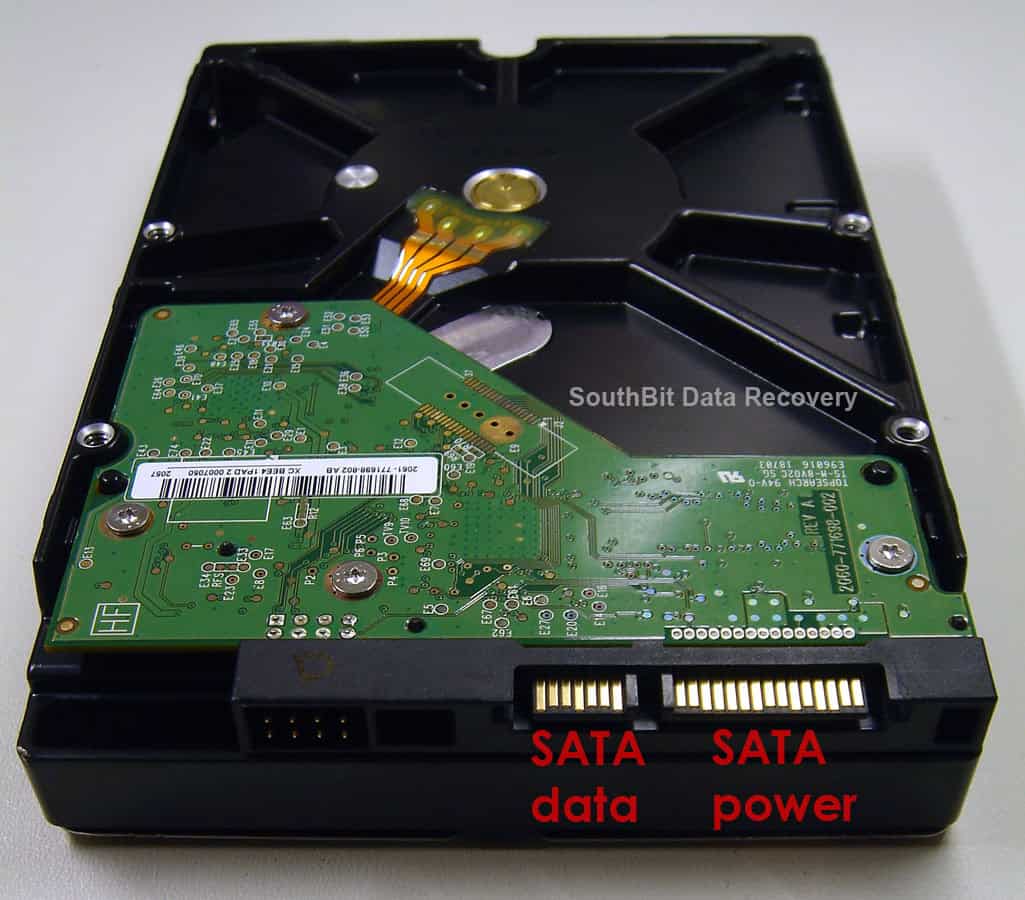
Flip the drive over and you'll see the printed circuit board — the green electronic board covering roughly half the underside of the drive. On most Western Digital drives, the active components face inward toward the drive body, which protects them from physical damage. Some manufacturers (notably older Samsung models) place components on the outer-facing side where they are far more vulnerable.
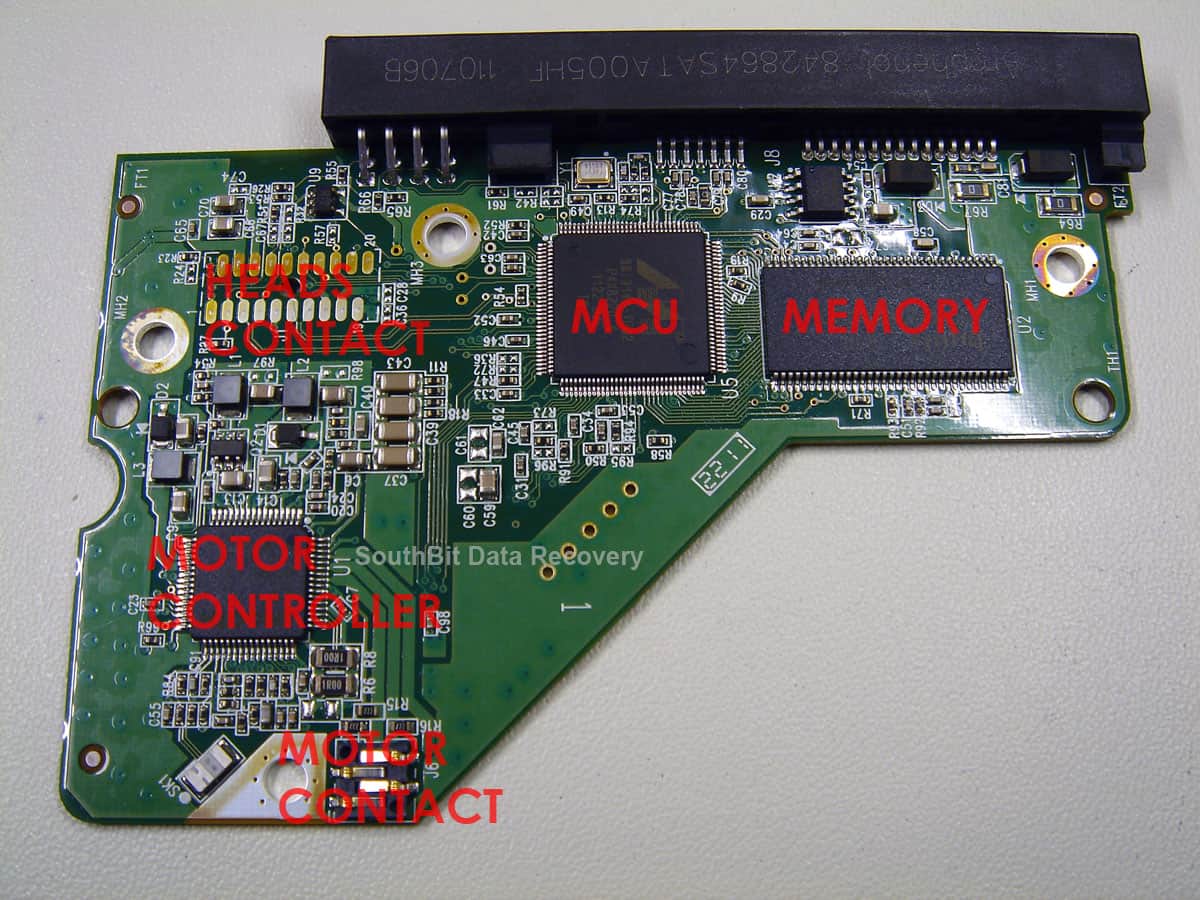
When the PCB is removed, its inner face reveals three main active components:
- Main Controller Unit (MCU): The processor of the drive — it handles all computing operations and data flow. Think of it as the drive's CPU.
- Motor Controller: Manages platter spin speed and controls the voice coil that moves the head assembly.
- Cache (onboard memory): A small memory chip that buffers data being read from or written to the platters — the drive equivalent of RAM.
Also on the PCB is the ROM chip — sometimes a separate 8-pin IC, sometimes integrated into the MCU. The ROM holds the portion of firmware required to start the drive up; the rest of the firmware is read from the platter's service area once the drive initialises.
🔧 What this means for data recovery
PCB failure is a common result of power surges or plugging in the wrong power adapter (such as a 19V laptop charger into a 12V external drive enclosure). The drive appears completely dead — no spin, no sound. In most cases the platters and data are completely intact. Recovery involves sourcing an identically matched replacement PCB and transferring the unique ROM firmware from the original — a process that requires specialist equipment. Read more about HDD data recovery.
SATA connectors
SATA drives have two connectors at the rear of the drive. The narrow connector is the data interface — it carries data to and from the drive at up to 600 MB/s on SATA III. The wider connector is the power supply, carrying both 5V and 12V lines. On 2.5″ laptop drives the power and data connectors are the same width and form a single combined interface.
Opening the drive — why a cleanroom is essential
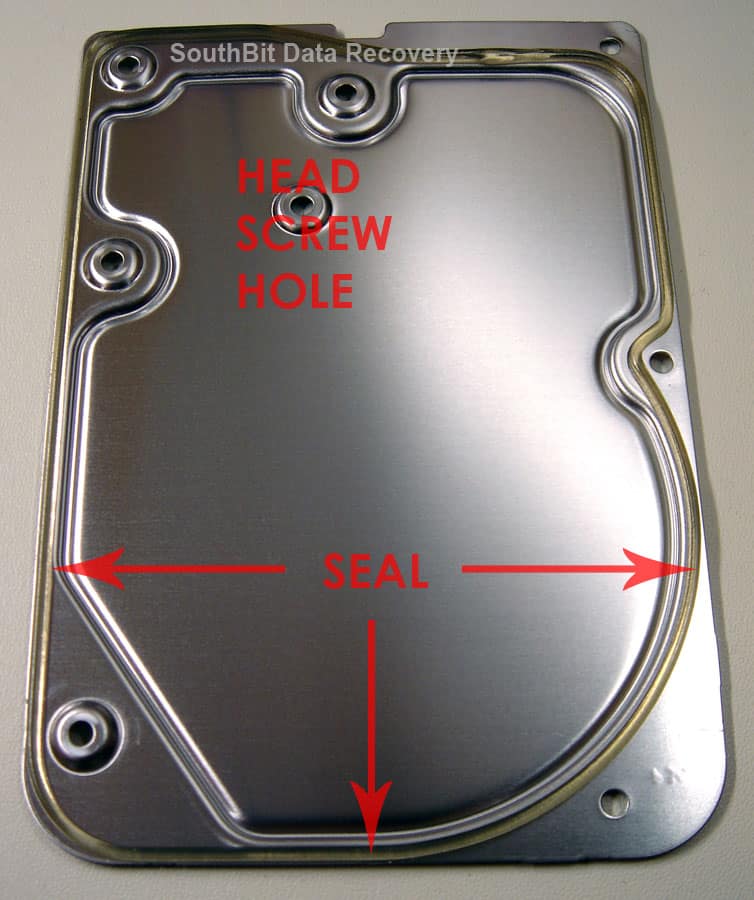
The top lid of the HDA is held in place by T8 Torx screws around its perimeter, with an additional hidden screw beneath the label on most drives. On the underside of the lid sits a rubber gasket seal that maintains an effectively particle-free environment inside the HDA. That seal is the only thing standing between the drive's platters and the surrounding air.
⚠️ Why you must never open a hard drive at home
The gap between the read/write heads and the platter surface is approximately 5 nanometres. A particle of household dust is typically 5,000–10,000 nanometres in size — the equivalent of a boulder landing on a runway where a jet is about to land at full speed. Even in a seemingly clean room, normal air contains tens of thousands of such particles per cubic metre, invisible to the naked eye.
If a particle lands on a spinning platter while the drive is open, it causes an immediate head crash — the head strikes the platter surface and gouges it. Data in that area is destroyed permanently and no recovery tool in the world can retrieve it. Our lab uses a HEPA-filtered cleanroom that removes 99.97% of particles down to 0.3 microns. If your drive requires physical work, do not open it. Send or bring it to us as-is.
Inside the hard drive — main internal components
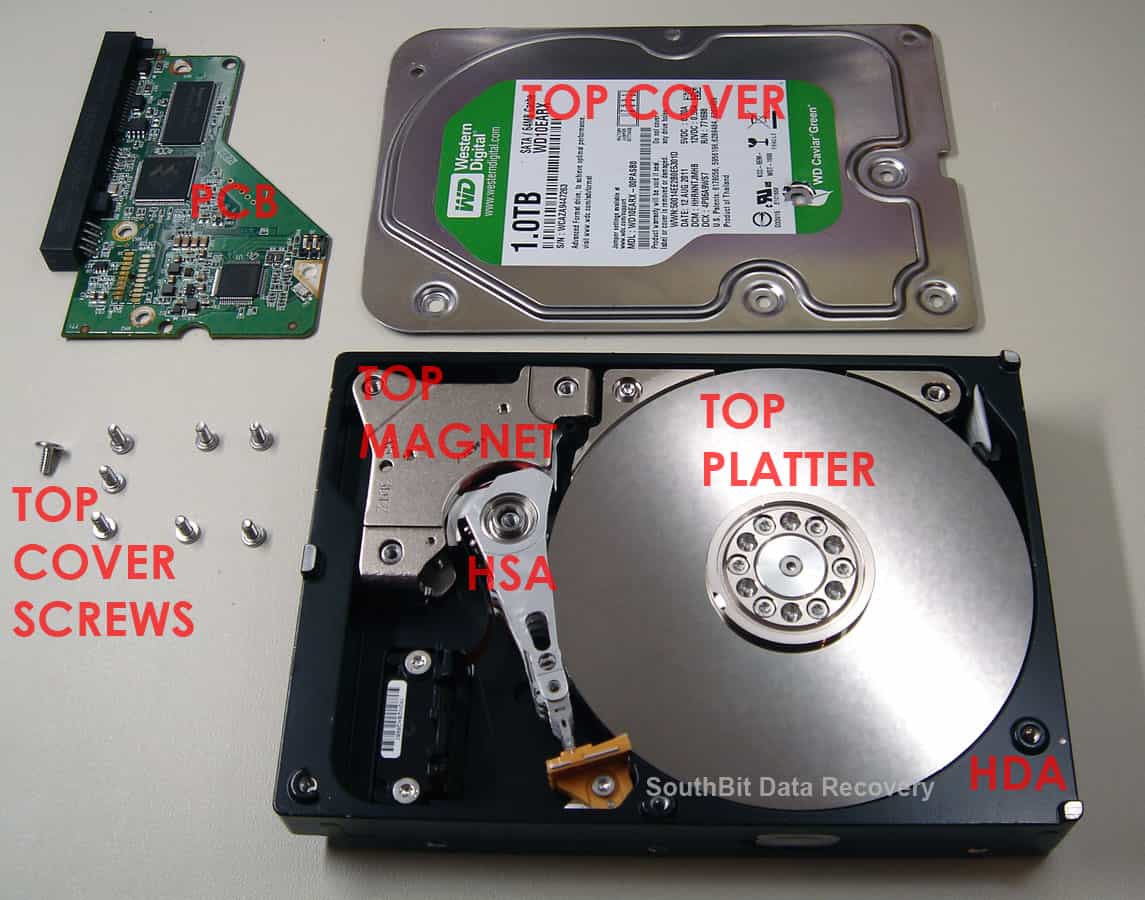
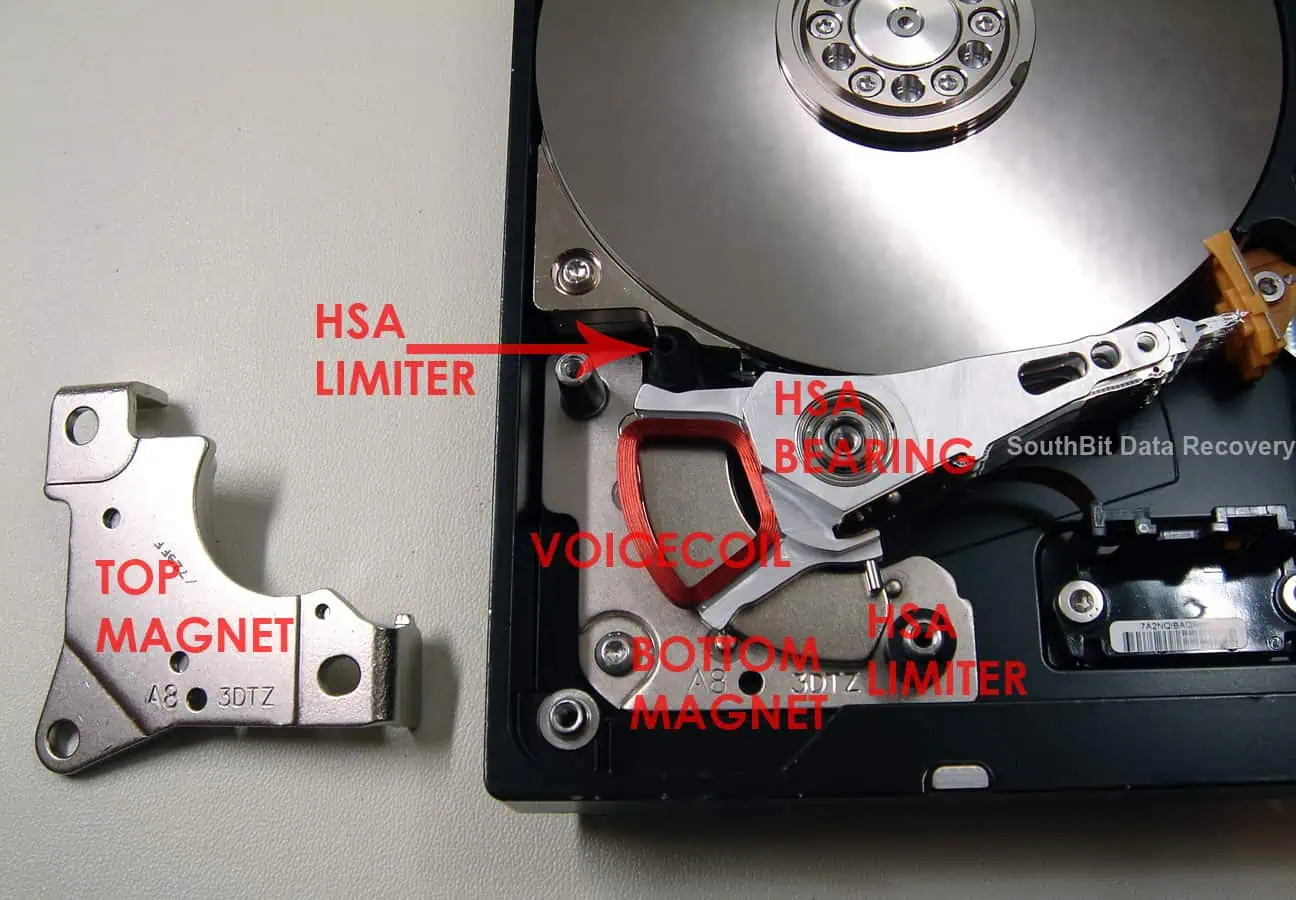
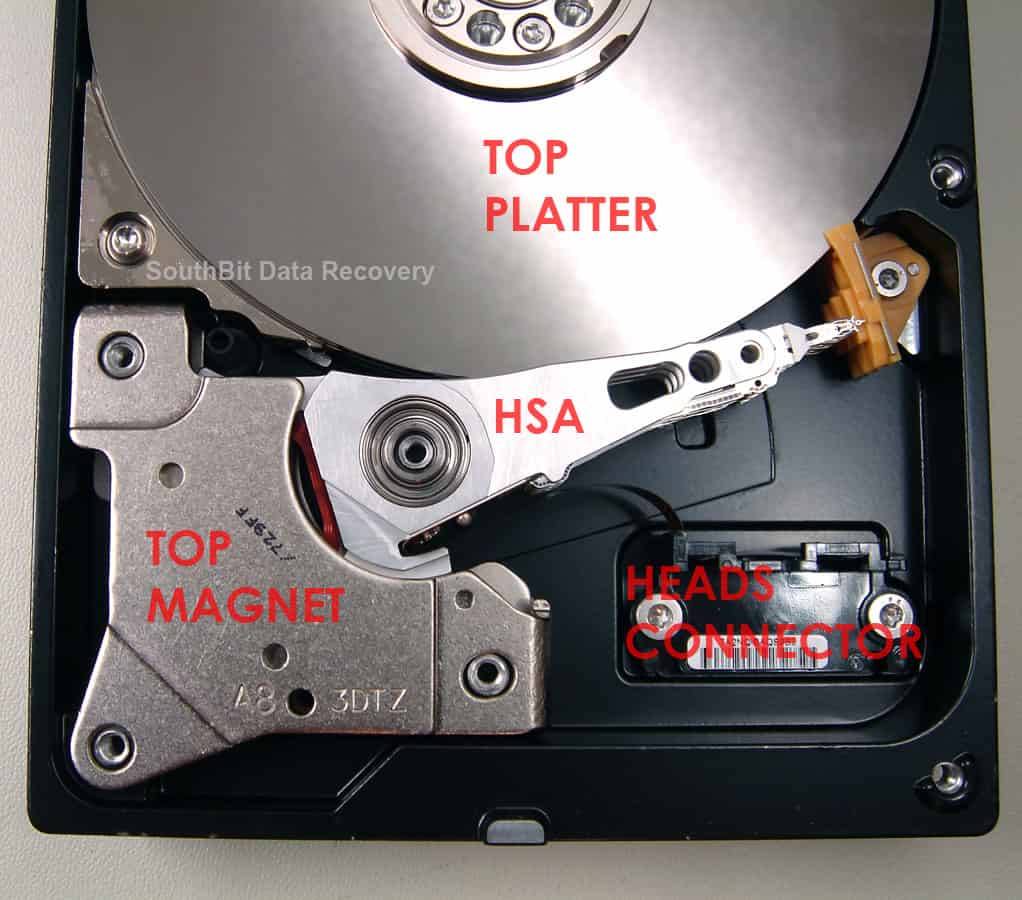
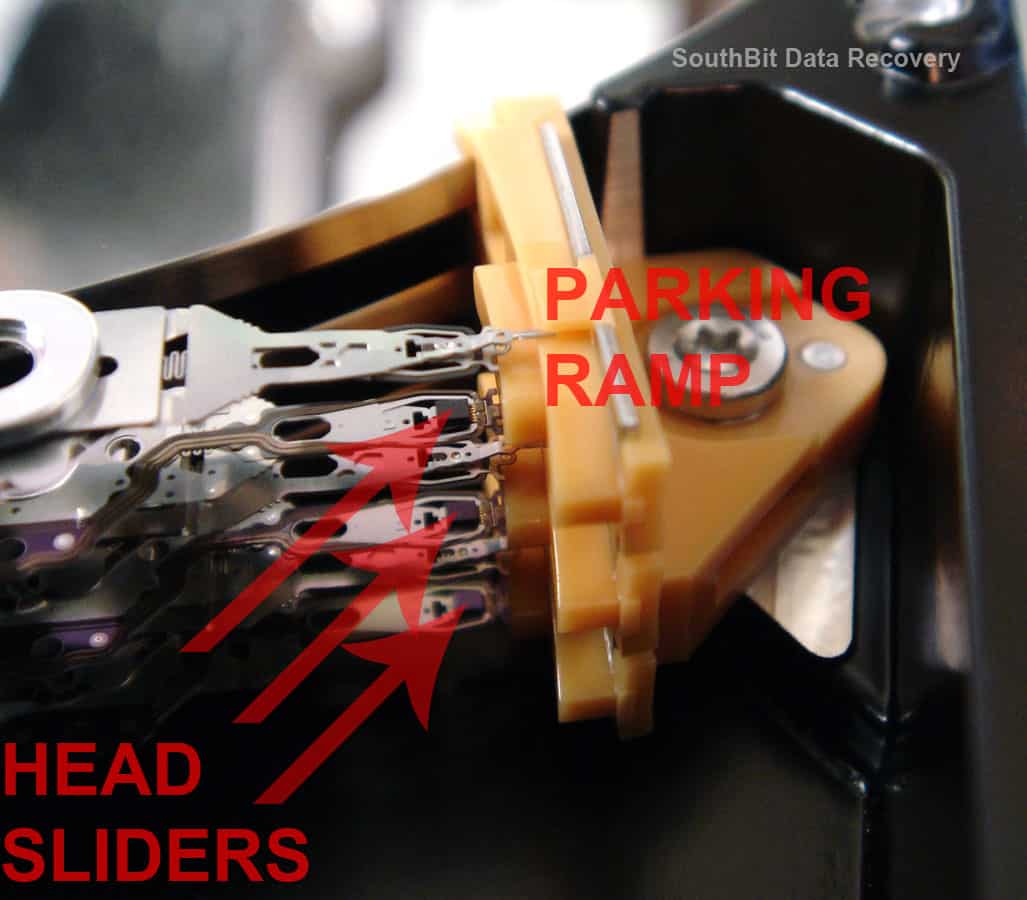
With the lid removed in a cleanroom environment, the internal components of the drive become visible. The platters — one or more highly polished discs — are mounted on the central spindle. In a 1TB 3.5″ drive, you'll typically see one or two platters. Higher-capacity drives stack more platters on the same spindle. The head stack assembly (HSA) sits to one side, with its arms extending over the platter surfaces. Two neodymium magnets bracket the voice coil that drives HSA movement. A plastic ramp at the outer edge of the platters parks the heads safely when the drive powers down.
The air filter
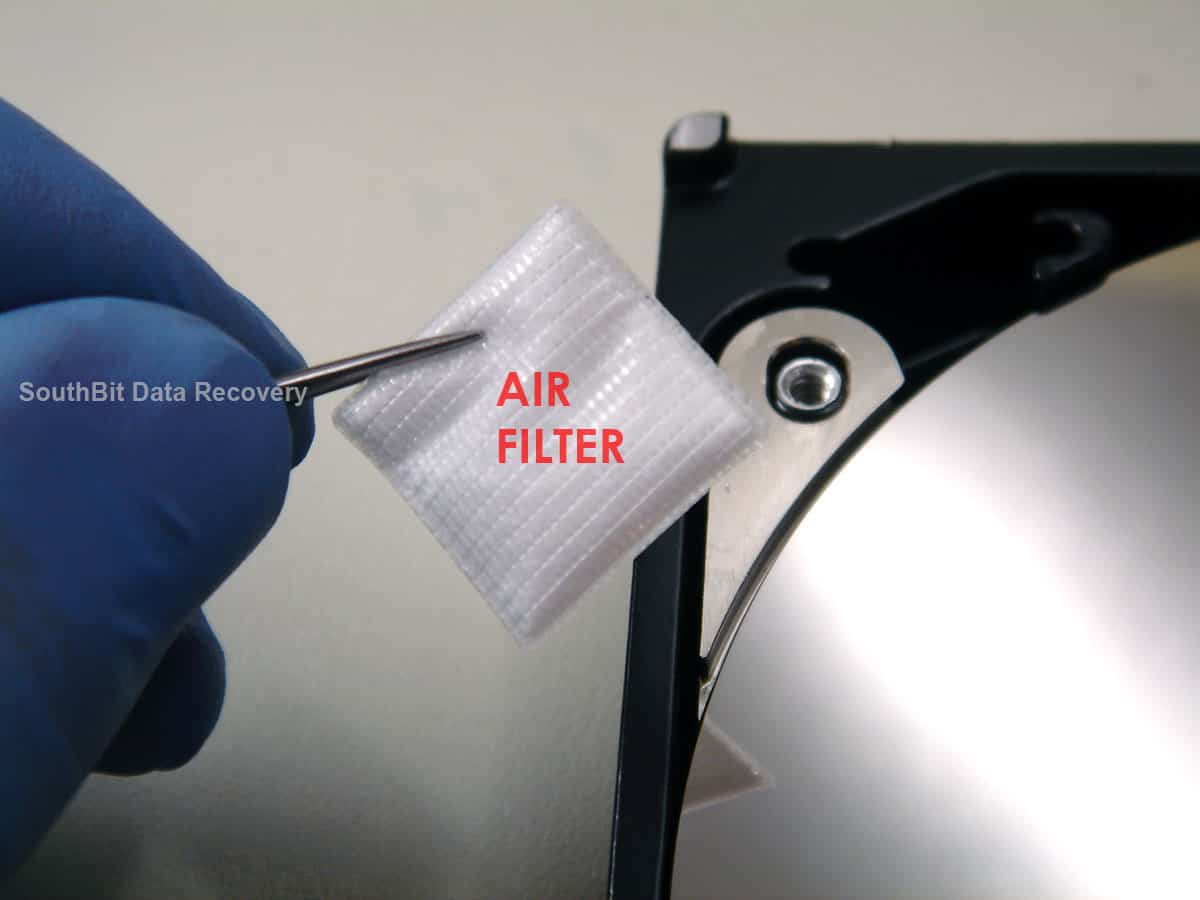
Although the HDA is sealed, the air inside it does circulate as the platters spin at high speed. A small internal air filter collects microscopic particles generated during normal operation — oil from the motor bearing, metallic fragments from normal wear, and any other micro-scale contamination. This filter keeps the internal air clean during the drive's operating life.
🔧 What the air filter tells us as technicians
A heavily contaminated filter — appearing dark grey or black — is one of the clearest indicators of a head crash. The dark material is metallic and magnetic particles scraped from the platter surface and head sliders during the crash event. When we see this, we know immediately that platter damage is likely and that the recovery will require careful imaging to work around damaged areas.
Magnets and the voice coil
The HSA is driven by a voice coil actuator — the same electromagnetic principle used in a hi-fi speaker driver. A coil attached to the HSA sits between two powerful neodymium magnets (one above, one below). When current passes through the coil, it creates a magnetic field that interacts with the permanent magnets and moves the HSA precisely in either direction. Stoppers at each end of the voice coil's travel limit how far the heads can move, preventing them from going off the edge of the platter.
The neodymium magnets used here are among the strongest permanent magnets available — capable of holding roughly 1,000 times their own weight. This is why drives that have been physically disassembled by untrained hands often return to us with these magnets cracked or shattered, which makes head replacement significantly more difficult.
The heads connector
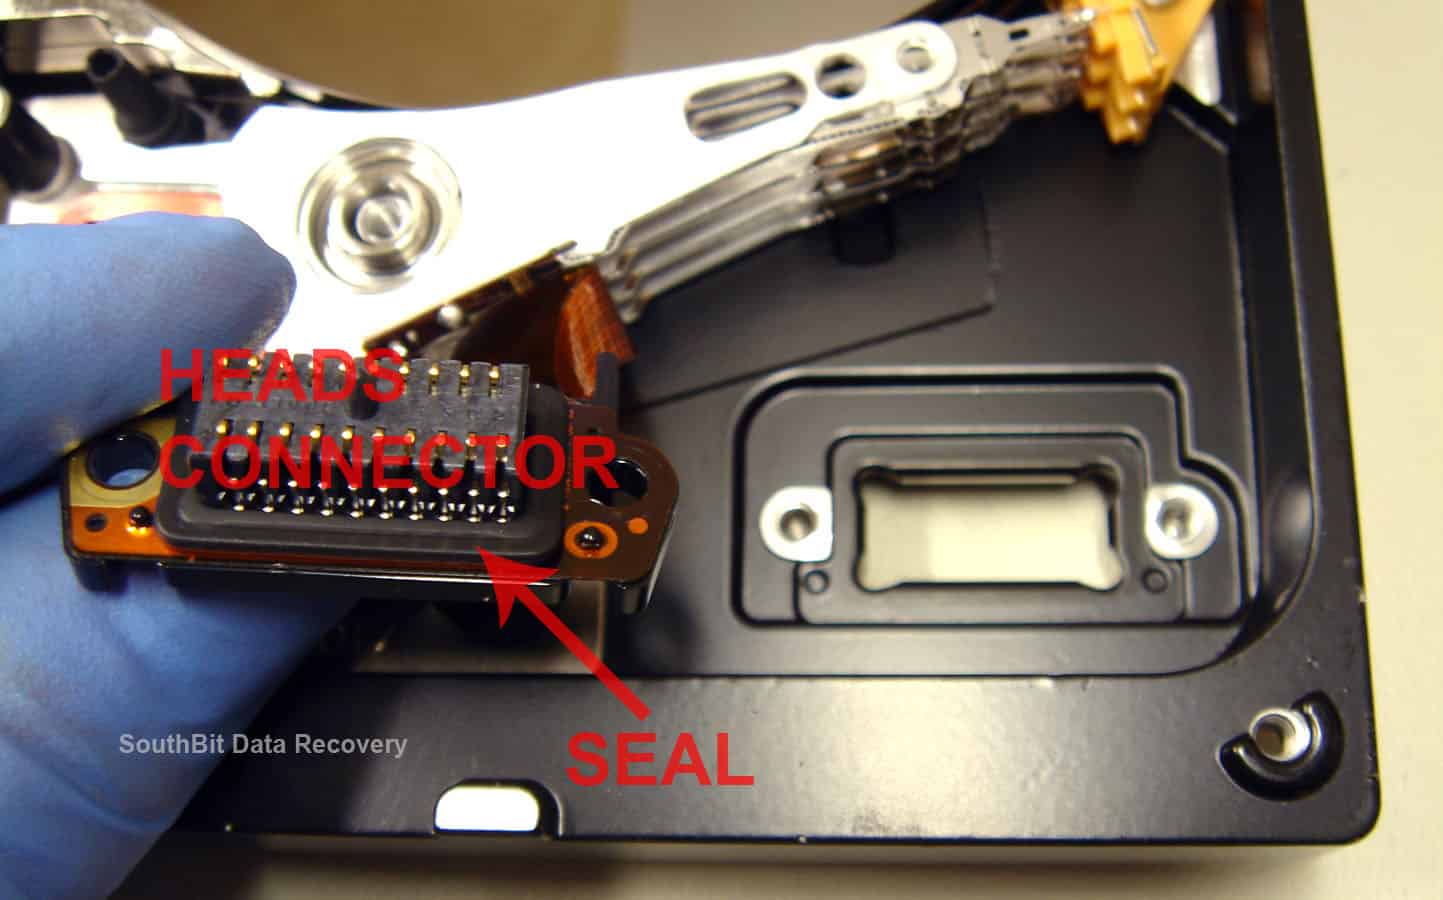
A plastic connector routes the extremely fine signal wires from the read/write heads, through the wall of the HDA, to the corresponding contact pads on the PCB. A rubber seal around this connector prevents any outside contamination from entering the HDA through the opening. This seal is part of what makes the HDA effectively particle-free during normal operation.
The head stack assembly (HSA) and read/write heads
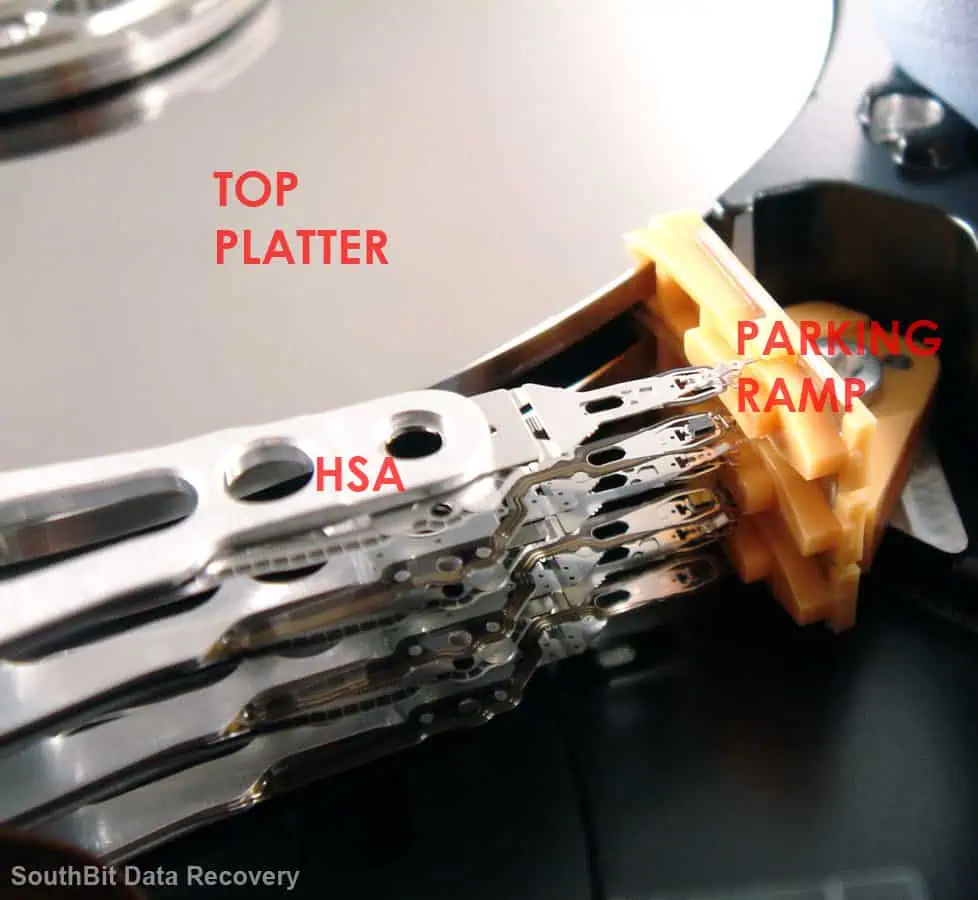
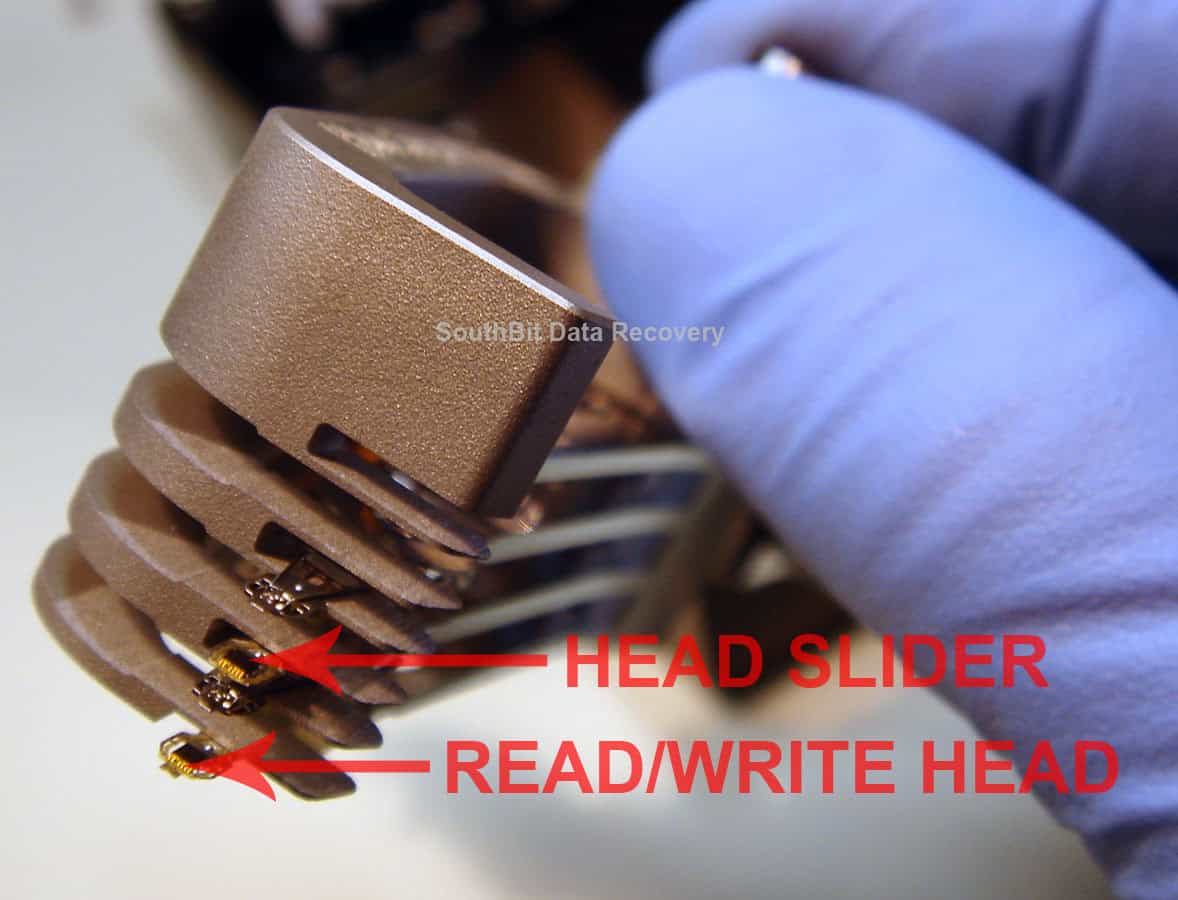
The head stack assembly holds the read and write heads at the ends of its arms — one head for each platter surface. A 3-platter drive will have six heads: one for the top and one for the bottom of each platter. When the drive is powered down, the heads are parked on a plastic ramp at the outer edge of the platters, safely off the platter surface. When the drive spins up, the heads unload from the ramp and begin flying over the platters.
🔔 Failure symptom: the clicking sound explained
If your drive is making a rhythmic clicking or ticking sound, the HSA is almost certainly the cause. The heads are attempting to read from the platter surface, failing to find a valid position (because the heads are damaged or the firmware service area is unreadable), and resetting back to the ramp — only to try again immediately. This repetitive seek-and-reset cycle is the clicking sound. Every click means the heads are sweeping across the platter surface, which can accelerate platter damage. Power the drive off immediately and do not attempt to use it further. Learn more about common hard drive failures.
Sliders — how heads fly above the platter
The read/write heads themselves are not the rectangular black objects visible on the end of the HSA arms — those are the sliders. The actual head elements are so small they require a microscope to see clearly. The slider's aerodynamic shape is what generates the thin air bearing between the head and the platter surface as the platter spins. At operating speed (5,400–7,200 RPM), airflow under the slider lifts it to within approximately 5 nanometres of the platter — a gap far thinner than a human hair.
The preamp
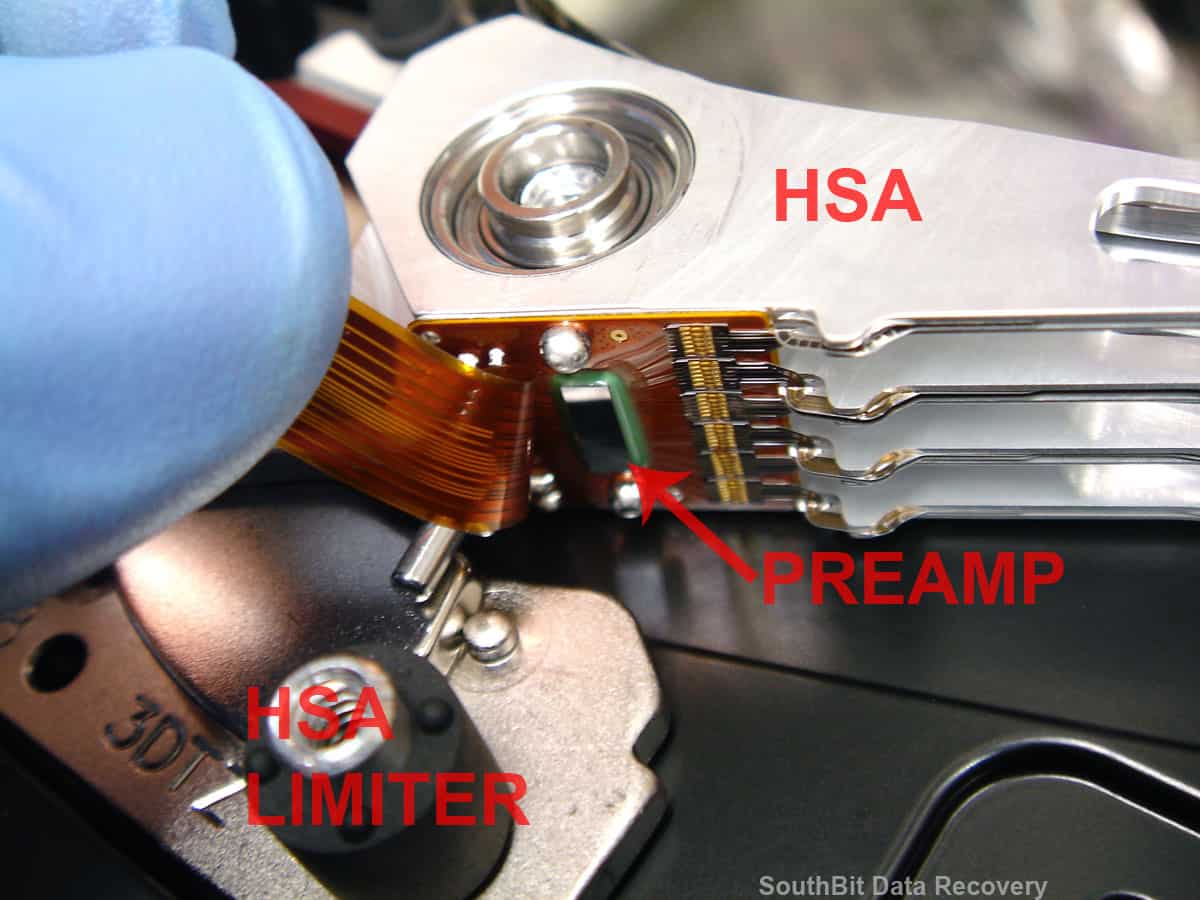
The signals produced by the read/write head elements are extraordinarily weak — they need to be amplified before they can be processed by the drive's electronics. The preamplifier, or preamp, is mounted directly on the HSA to keep signal loss to a minimum. It amplifies incoming read signals and conditions outgoing write signals before they reach the PCB.
🔧 Preamp failure — the most misunderstood "head failure"
When a drive produces a clicking sound and diagnostics indicate a head failure, the actual head elements are often still intact — it's the preamp that has failed. Because the preamp is part of the HSA, it cannot be replaced in isolation: the entire head stack must be swapped. This requires an identically matched donor HSA, cleanroom access, and considerable skill to align the new heads correctly. When we diagnose a head failure, determining whether it is the preamp or the head elements themselves affects how we source donor parts and approach the recovery.
Frequently asked questions
Can I replace my own hard drive heads at home?
No — and attempting to do so will almost certainly destroy your data permanently. Head replacement requires opening the HDA, which must be done in a particle-controlled cleanroom environment. It also requires a precisely matched donor head stack from a compatible drive, specialist tools to safely remove and install the assembly, and the ability to re-calibrate and adapt the new heads using professional firmware tools. Even for trained technicians, head swaps are among the most delicate procedures in data recovery.
Why is my hard drive making a clicking sound?
A rhythmic clicking or ticking sound almost always indicates a mechanical failure — most commonly a failed or failing head stack assembly. The clicking is the sound of the heads repeatedly attempting to read from the platter, failing, and resetting. Power the drive off immediately and do not turn it on again. Every power cycle increases the risk of further damage to both the heads and the platter surface. Contact us for a free assessment.
My drive is completely silent — is it repairable?
A completely silent, non-spinning drive usually points to a PCB failure or a seized spindle motor. PCB failure is common after power surges and is often recoverable — the platters and data are typically intact. A seized motor is more complex: the platters must be transferred to a matched donor drive in a cleanroom, which is a high-difficulty procedure. In both cases, professional assessment is the correct first step. Do not attempt to "fix" a non-spinning drive with DIY methods.
What is the "service area" of a hard drive?
The service area (also called the system area or module area) is a reserved zone on the platters — not accessible through normal operating system channels — that stores the drive's firmware modules. These include head calibration data, defect lists, grown defect tables, and operational parameters unique to that individual drive. When firmware corruption occurs, the drive may not initialise at all, even though the user data on the platters is completely intact. Firmware repair requires specialist tools such as the PC-3000 UDMA.
Can I open my hard drive to check if the platters are scratched?
No. Opening a drive outside a cleanroom guarantees contamination — particles will land on the platter surface immediately. Even if you could see platter damage with the naked eye, the act of opening the drive would have already made the situation significantly worse. If you suspect platter damage (severe grinding sounds, prior head crash), bring or send the drive to us as-is. We can assess it in our cleanroom without compromising the remaining recoverable data.
How much does hard drive data recovery cost?
Our pricing depends on the drive capacity and the type of failure — logical, firmware, electronic (PCB), or mechanical (head replacement). We offer a free 24-hour written assessment with no obligation to proceed. If we cannot recover your data, there is no charge. See our full pricing page for current rates in ZAR.
Do I need to send my drive in, or can I bring it to your lab?
Both. Our lab is in Claremont, Cape Town — walk-ins are welcome. For clients outside Cape Town, we offer a nationwide courier service. Many of our clients courier drives to us from Johannesburg, Pretoria, Durban, and further afield. We provide guidance on how to safely package your drive before shipping. See our courier page for details.
Drive failed? We can help.
4.9★ rated across 700+ Google reviews · Free 24-hour quote · No fix, no fee
